


Since I get this question quite often, I’ll just make a quick tutorial!
![tomkirk:
[ updates tab #1 ]
livepreview :: code
details and instructions on how to add more tabs under the cut!
Read More](https://38.media.tumblr.com/f9440f61034bc467c6dc35a96aa30230/tumblr_n27nkzX8r41s7wczpo1_250.png)
[ updates tab #1 ]
livepreview :: code
details and instructions on how to add more tabs under the cut!
I used the four tabs on my blog (thanks) and i want to put links in them. how do i do that? i tried but they just come out as text
thanks, it’s been answered many times but sure. Use the link code
<a href=”http://url.com”>name</a>
re-type all the ” marks afterwards
lol no i was thinking something like roseybows or euflohria's or even daisiechanels. sorry i wasn't more specific. :O
Ohh I see now! haha it’s okay.
They just have edited versions of this tutorial. They changed the border-radius of the tabs to make them a different shape. You can choose what you want the borders to look like by going to this site and messing with the border-radius of each corner, then copy the code it gives you and replace the border-radius of the tabs you have currently.
Use this tutorial as it serves the same purpose
hi! im using your bubble tab and i was wondering if it was possible to have a scroll for the bubble tab bc it wont fit xx
you can change the height under #tabs:hover; to make it longer
or you can make it scroll by adding overflow:scroll; under #tabs:hover;
Social Media Buttons Box!
This tutorial shows you how to get a little box that is on the right side of your blog, which holds up to 4 social media buttons!
Preview: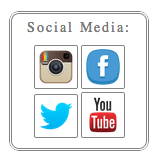
1. Paste this code into your html directly before </style>
2. Paste this code directly under <body>. Click Update Preview then Save.
3. Change the links in the second code so that they link to your social media sites.
4. OPTIONAL: You can change any of the icons to another icon, use this site to find good ones. To add them, right click and select “copy image url” then paste that into the second code after img src on which ever link you want to change the icon for!
All codes written by dazieh. Please *Like* this tutorial if you found it helpful!!
Hii just wondering: 1 - how to add little icons to my hover tabs in place of the "+" and 2 - when you hover over the top tab, it srolls out behind the bottom one...how can I fix that? thanks xox
1. To change the plus sign you find it in the code and replace it with an image using <img src=” url of image goes here”> and make sure the image is the size you want it to be, because large images will stay large. You can change it to any text symbol or a small gif.
2. Look under #tab1 {, and change the z-index:99999; to z-index:999999;
How to add broders or boxes in my hover tab like i have a section of about me, and network (which as you) but i can seem to get a border around it???
you mean like dividers?
<div style=”color:#000000; background-color:#aaa; padding:3px;">TITLE</div> <br>
Paste this in the code and retype “s if it’s not green
for the bubble tab with borders, how do you change the icon? it originally gives me a + sign and in the tutorial it says to remove the plus and use this code <img src="URL"> but i can't even find the plus to remove
it’s in
<b><div style=”font-size: 32px;”>+</div></b><br><p>
I have bolded the plus
Glitter Borders for Bubble Tab
Paste this code under #tabs:hover{ in your bubble tab code. If you don’t have a bubble tab yet, check out this tutorial or this tutorial!
OPTIONAL:
- Change border:4px; to a bigger or smaller number to change the size of the borders.
- Change All of the URLS in the code (highlighted in the image below) to a different url from THIS website!

- Make sure you change all of the URLS or it will not work!!
Please *LIKE* this tutorial if you found it helpful!
how do you do get the pink highlight thing over the titles in the hover tab? like in (example: rosea-kiwi's) blog and alot of others?
use:
<div style="background: #htmlcolor;padding: 5px;font-size: 12px;"><b>text</b></div>
The font size can be changed to any size! Go to our “more” tab for an html color picker!
Under <style> or above </style> or after <style type=”text css”> add
-moz-border-image: url(http://www.rayesdesign.com/glitters/pink/pink003.gif) 27 27 27 27 repeat;
-webkit-border-image: url(http://www.rayesdesign.com/glitters/pink/pink003.gif) 27 27 27 27 repeat;
-o-border-image: url(http://www.rayesdesign.com/glitters/pink/pink003.gif) 27 27 27 27 repeat;
border-image: url(http://www.rayesdesign.com/glitters/pink/pink003.gif) 27 27 27 27 repeat;
after #oneout{
That’s if you use the one by spicee like I think you do
You can get other images as well
Slide From Left Updates/Networks Tab
Here is how the tab will look on your blog:
Here is how to install the hover tab on your blog:
- First, find </style> in your theme. An easy way to do this is by pressing Ctrl+F and typing </style>.
- Once you find that, paste this code directly above it. If you cant find <style>, just paste it after <style> or <style type=”text/css”>.
- Next, you need to find <body> or </body>
- Once you have found that, paste this code either after <body> or before </body>
Now to customize your hover tab!
- Replace “SLIDE TITLE” with what you would like your tab to say. (ex: HOVER) You can also use some cute text symbols from here!
- Then replace “SLIDE TEXT GOES IN HERE (NETWORKS/UPDATES/WHATEVER YOU WANT)” with what you would want to say in your tab! Use the tag <br> to create a new line within the text!
* Like this post if you found it helpful! *
(Source: easy-html-tutorials)
Bubble tab with dotted borders
PREVIEW: 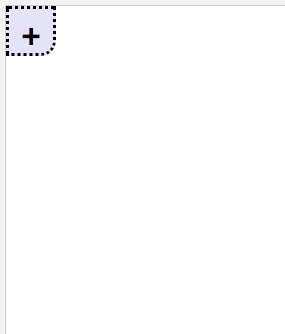
Paste this code under
<style type="text/css">
or before
</style>
- If you do not want dotted borders, find “border:dotted;” and change it to solid, or, if you don’t want a border, remove the line of the code.
- To change your box color, find the code under
.ttitle {and change it to any color that you would like - To change height of box that the icon is in, find
#tabs{and change the width/height - To change height of hover box, find
#tabs.hover{and change height/width
Now paste this code under <body>
- To make the icon a different one, remove the plus and use
<img src="URL">
(retype quotation marks) - To make the dividers another color find background and change the HTML color.
- Marquee is already installed for networks
Please look here before asking questions about this tutorial!
Credit goes to html-tutorials