


Faded posts on hover!
Paste under <style type=”text/css> , numbers can be edited.
Flip them for a post that becomes full on hover and faded when not.
img{ -webkit-transition: opacity 0.8s linear; opacity: 0.60; }
img:hover{ -webkit-transition: opacity 0.8s linear; opacity: 1; }
Like this if you found it helpful!
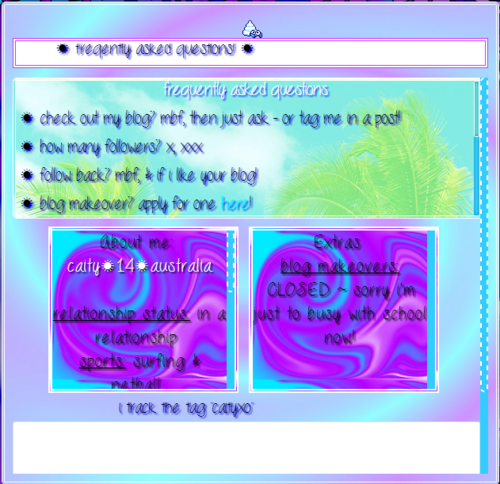
Pop-up Faq/Ask Layout #2
this includes: animated title, faq’s box (with scrollbar, border & background) 2 boxes (for about you/extra, with scrollbar, background, and border) ask box, scrollbar, and animated tag name!
this is a preview
1. you MUST have a pop-up faq/ask, for my tutorial go here2. find your pop-up link coding under <body>
3. replace your current faq/ask content with this code
4. now scroll up to </style> and place this code directly above it
5. now find <head> in your coding and place this code directly below
credit: with help of http://tutorial-baby.tumblr.com/
Social Media Buttons Box!
This tutorial shows you how to get a little box that is on the right side of your blog, which holds up to 4 social media buttons!
Preview: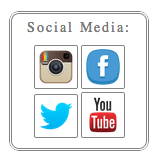
1. Paste this code into your html directly before </style>
2. Paste this code directly under <body>. Click Update Preview then Save.
3. Change the links in the second code so that they link to your social media sites.
4. OPTIONAL: You can change any of the icons to another icon, use this site to find good ones. To add them, right click and select “copy image url” then paste that into the second code after img src on which ever link you want to change the icon for!
All codes written by dazieh. Please *Like* this tutorial if you found it helpful!!
Sectioned Hover Tab!
All codes written by me (dazieh)!
Preview:

To Install:
1. Paste this code under <style> or before </style>
2. Paste this code under <body>
3. Click update preview, if everything looks good save it. Then you can fill in all your links for your networks and faves!
HOW TO ADD MORE SECTIONS! (Note: this question will not be answered anymore because there is now a short tutorial on how to add another section to this tab)
*PLEASE LIKE THIS TUTORIAL IF YOU FOUND IT HELPFUL! *
do you have a tutorial on how to make the hover tab like tribal-tree and fiji-fruits ? and how fiji-fruits made her link color like that? and also how to put the picture between the links? I'm asking too many questions, sorry
fiji-fruits’s links: Find a: hover { and add this:
background: url(http://24.media.tumblr.com/tumblr_mbvyurHCBG1qg63fko1_500.jpg); -webkit-text-fill-color: transparent; -webkit-background-clip: text;
If you don’t have a:hover add this:
a:hover{
background: url(http://24.media.tumblr.com/tumblr_mbvyurHCBG1qg63fko1_500.jpg); -webkit-text-fill-color: transparent;
-webkit-background-clip: text; }
fiji-fruits’s hover tab:
We have a tutorial already, look here.
I can make a tab like tribal-tree and post a tutorial when I’m done so check back soon!
Fuzzy Text on Hover
step 1. go to customize, then click edit html.
step 2. ctrl+F for a:hover{ or a:hover { and paste this under it:
color: transparent;
text-shadow: #000 0 0 3px;
text-decoration:none;step 3. change #000 to the color of your links or whatever color you want.
step 4. click update preview and save.
"Rate My Blog" Widget
step 1. go to https://polldaddy.com/login/ and either sign in if you already have an account, or create a new account by following the instructions given.
step 2. click the blue “Create a new…” button on the left and then select “Rating”.
step 3. select either 5-Star Rating or Nero Rating on the right, and customize according to your preferences. the preview is on the bottom right.
step 4. click the “Save Rating Widget” button. click “Collect Votes”, next to the design rating button.
step 5. copy the code and paste it under <body> in your theme html.
Social network buttons under follow and dashboard buttons!
Cute hover tab!
back to top button
- this back to top button contains codes where you can change the button image.
- it also appears only when you scroll down.
- it slides back when you click the image
1. Go to this site: http://freetexthost.com/y1aokxgoeu
2. And copy all the codes.
3. Paste the codes under <head>
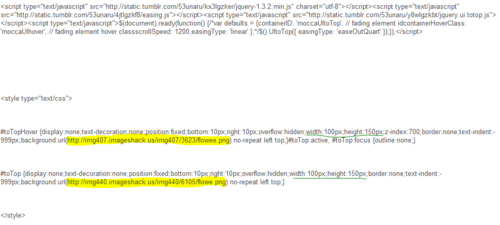
the highlighted code is where you can change the button image
the underlined codes are where you can change the height and width of the image
Credits to: theamazingtutorials
Heyy! This blog is so helpful!!! I was wondering if you could add a tutorial about how to make your post faded?
Paste this code underneath <style type=”text/css”> in your theme and save it.
How to make your own banner!
Since I get a lot of requests for banners on my main blog, I figured I’d make a tutorial for people to make their own banners!
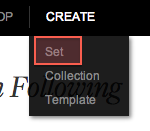
- Go to http://www.polyvore.com/ and create an account or log in. \
- At the top of the home page, hover over the Create link and click Set in the drop down menu.
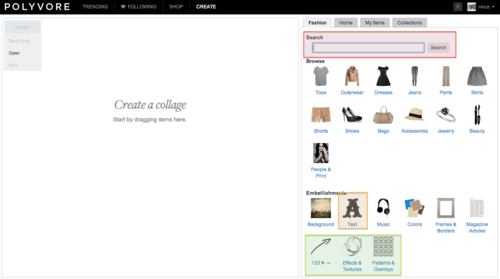
- Then you can add anything you want to your set!!! Start with finding your favorite font, and add it with your url or blog title.
- Now you can add anything you want!
- Here are the main areas you can find things to add to your banner/set:
Like this if you found this tutorial helpful!