Paste this code after <head> or before </head>
Note: the bubbles won’t show up on the customize page, you have to click save and then close the customize page to see the bubbles!


|
|
|
|

|
|
|
|
Paste this code after <head> or before </head>
Note: the bubbles won’t show up on the customize page, you have to click save and then close the customize page to see the bubbles!
Preview: (Live Preview)
1. Start off by finding </style> and copy and paste this code directly before it. (You can also past it directly after <style type=”text/ccs”> if you cant find </style>)
2. Then find <body> in your theme, and paste this code right after it. You can also paste it right before </body>
3. Customize to your hearts desire! Everything is labeled in the html. You can change the color, add all your announcements and networks, you can change the width and height of the tabs. Almost anything is possible!!! If you have any questions feel free to ask!
Code written by me (dazieh)
Please look here before asking questions about this tutorial!
*Like this tutorial if you found this helpful or are using this code!*
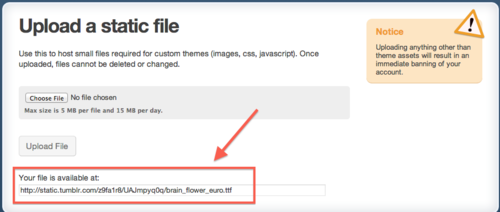
There are a lot of tutorials on this but some of them don’t work, this one actually works! Add the following code after the url of the image:
style='height: 75px; z-index: 1;'
It should end up looking something like this:

Just change the number 75 to any other number to make the image bigger or smaller!
Please *LIKE* this tutorial if you found it helpful!
Paste this code under #tabs:hover{ in your bubble tab code. If you don’t have a bubble tab yet, check out this tutorial or this tutorial!
OPTIONAL:

Please *LIKE* this tutorial if you found it helpful!
Add this to your image code or image hover code
border: 2px dashed #ffffff;
Change the pixels to desired width, dashed to dotted/solid/ect, and #ffffff to your HTML color code
If you would like your bubble tab to be in the bottom RIGHT corner of your blog:
If you would like your bubble tab to be in the bottom LEFT corner of your blog:
Refer to this tutorial for customization options!
Please look here before asking questions about this tutorial!
Please *LIKE* this tutorial if you found it helpful!
For a customizable scrollbar in your Pop Up windows:
Paste this code before </style> or after <style type=”text/ccs”>
Then, go to your pop up in your html (should be near the bottom) and add:
<div class="scroll">
Then before the end of your pop up code add </div> It should end up looking like this: (however the number you have after div id may be different)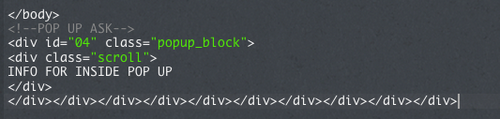
To customize the scrollbar:
Please *LIKE* this tutorial if you found it helpful!
Add this to your post or image hover code (depends on theme. message us if you need help finding it)
-moz-box-shadow: 0 0 20px 5px #000000;
-webkit-box-shadow: 0 0 20px 5px#000000;
box-shadow: 0 0 20px 5px #000000;
20 is size of glow and #000000 is your glow color.
To get your FAQ and Ask on the same page:

* LIKE THIS TUTORIAL IF YOU FOUND IT HELPFUL *
Making a tagged page is very simple!
Every post you tag #mine will show up under http://YOUR URL.tumblr.com/tagged/mine
Every post that is tagged with that certain tag will automatically show up on that page! That’s all there is to it :)
* LIKE THIS TUTORIAL IF YOU FOUND IT HELPFUL! *
1. Go to your customize page.
2. Scroll down to the “Pages” section and choose “add a page” and a window will pop up like this: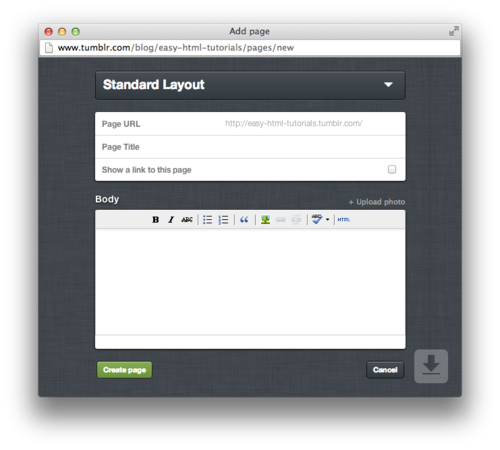
3. Choose a url, title, and check the box to show a link to the page: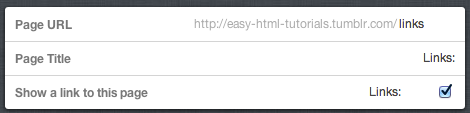
4. Add your links onto this page, and click “Create Page” then “Save Page”
5. Some links you can add are tagged pages (like My Uploads), or links to external websites like instagram!
6. If you don’t know how to add a link, type out what you want the title of the link to be, select it, and click the Insert Link button 
* LIKE THIS TUTORIAL IF YOU FOUND IT HELPFUL! *
This tutorial has a lot of steps, but it is pretty easy if you follow them correctly!

* LIKE IF YOU FOUND THIS TUTORIAL HELPFUL *
I believe this code only works on Narnia. All credits go to Tutorial Baby
Paste this code under .post:hover{
-moz-border-image: url(http://images2.layoutsparks.com/1/181496/pay-attention-silver-glitter.gif) 4 repeat;
-webkit-border-image: url(http://images2.layoutsparks.com/1/181496/pay-attention-silver-glitter.gif) 4 repeat;
-o-border-image: url(http://images2.layoutsparks.com/1/181496/pay-attention-silver-glitter.gif) 4 repeat;
border-image: url(http://images2.layoutsparks.com/1/181496/pay-attention-silver-glitter.gif) 4 repeat;
All credits go to Tutorial Baby
* like if you found this useful *
Not sure if this works on other themes. Credit goes to tutorial-baby
Add this to your post hover before the last } on Narnia, it is .post:hover
-webkit-transform: scale(1.3);
 -moz-transform: scale(1.3);
-o-transform: scale(1.3) ;
 -ms-transform: scale(1.3);
transform: scale(1.3) ;
-webkit-transition: 1s ease-in-out;
-moz-transition: 1s ease-in-out;
-o-transition: 1s ease-in-out;
z-index: 9999999999999999999;
1. Copy this code and paste it before </head> or after <head> in your theme code (use Control F to find it).
The url highlighted below is for the close button. You can change what it looks like by replacing the highlighted URL with another image URL. If you want the url of one of these close buttons, right click on the button you want and click ‘copy image url’ and paste it into the code.


2. Paste this code before </style> or if you can’t find that, put it after <style> or <style type=”text/css”>
The codes highlighted below are the colours of the pop up box background and the border, you can change them if you like using this website or the more tab on our blog.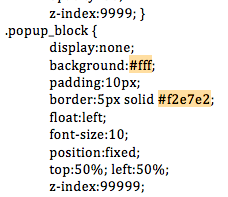
3. Find your ask link. It can be tricky to find for some people, but you have to replace it with this code.
It might look like <a href=”/ask”>ask</a> or <a href=”/ask”>message</a> or <a href=”{text:Link one url}”>{text:Link one}</a>
Message me for help with step 3 of adding a pop up ask box if you can’t find it.
You can change ‘MESSAGE’ to whatever you want the title of the link to be.
4. Paste this code after </body> in your theme code.
If you want to add an faq to your pop up ask box, find <center> and put your faq directly after it. Then, add <p> directly after your faq.
PLEASE LOOK HERE BEFORE ASKING QUESTIONS ABOUT THIS TUTORIAL! IT MAY HAVE BEEN ANSWERED!
Credit: megscoding
Please ‘like’ this tutorial if it was helpful! x
Where is my answer?
ALL questions are answered publicly so to avoid repeated ones.
Can you go onto my blog for me?
Can you help with adding/removing a column?
No, this is very advanced coding, and it would be easier to get a similar theme with the number of columns you want.
html-and-advice, html-tutorials, sc-customs and fyeahcodes
If you enjoy my tutorials, consider adding one of these to your blog!
|
|
|
|