


* Like this if it was helpful :) *
GLITTER GIFS: for post or hover tab borders!
Scrollbar in Pop Ups
For a default scrollbar (meaning you can’t change how the scrollbar looks in your pop up box)
Paste
width: 300px;
height: 400px;
overflow-y:scroll;
overflow-x:hidden;
under .popup_block{
Links Hover Effects
Rainbow links on hover:
- Paste this code directly before </head>
- (use Ctrl+F to find </head> in your html)
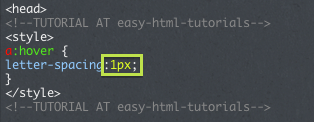
Spaced letters on hover:
- Paste this code directly after <head>
- (use Ctrl+F to find <head> in your html)
- If you would like the word to be more spaced out when you hover, change 1px (the section boxed in the image below) to a higher number like 2px or 3px
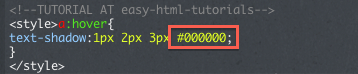
Text Shadow on hover:
- Paste this code directly directly after <head>
- (use Ctrl+F to find <head> in your html)
- To change the color of the shadow, change #000000 to a different color code from here.
*PLEASE LIKE THIS POST IF YOU FOUND IT HELPFUL*
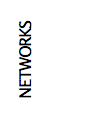
Slide From Left Updates/Networks Tab
Here is how the tab will look on your blog:
Here is how to install the hover tab on your blog:
- First, find </style> in your theme. An easy way to do this is by pressing Ctrl+F and typing </style>.
- Once you find that, paste this code directly above it. If you cant find <style>, just paste it after <style> or <style type=”text/css”>.
- Next, you need to find <body> or </body>
- Once you have found that, paste this code either after <body> or before </body>
Now to customize your hover tab!
- Replace “SLIDE TITLE” with what you would like your tab to say. (ex: HOVER) You can also use some cute text symbols from here!
- Then replace “SLIDE TEXT GOES IN HERE (NETWORKS/UPDATES/WHATEVER YOU WANT)” with what you would want to say in your tab! Use the tag <br> to create a new line within the text!
* Like this post if you found it helpful! *
(Source: easy-html-tutorials)
Bubble tab with dotted borders
PREVIEW: 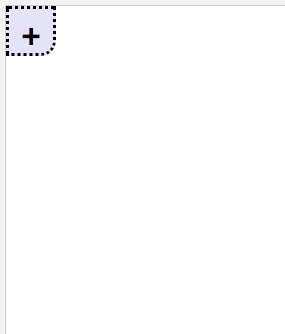
Paste this code under
<style type="text/css">
or before
</style>
- If you do not want dotted borders, find “border:dotted;” and change it to solid, or, if you don’t want a border, remove the line of the code.
- To change your box color, find the code under
.ttitle {and change it to any color that you would like - To change height of box that the icon is in, find
#tabs{and change the width/height - To change height of hover box, find
#tabs.hover{and change height/width
Now paste this code under <body>
- To make the icon a different one, remove the plus and use
<img src="URL">
(retype quotation marks) - To make the dividers another color find background and change the HTML color.
- Marquee is already installed for networks
Please look here before asking questions about this tutorial!
Credit goes to html-tutorials
Advanced Customization For the Slide from left Updates/Networks Tab!
To add a border around the inner part:
- Go to the section of your code: #oneout_inner
- At the bottom of that section of html, add this code. (before the } mark)
- Change the word “dashed” to “solid” or “dotted” to change the style of the border.
- Change the 1px to any number of px to increase the thickness of the border.
- Change “#000000” to any color code from here to change the color of the border.
To change font of the Title of the Hover tab (ex: HOVER)
- Find .onetitle in your html.
- Find where it says: font-family:arial;
- Replace the name of the font “arial” with either the font on your blog or a custom font.
To change the font inside the hover tab:
- Find #oneout_inner
- Add font-family: and the name of the font you want to that section of coding.
*LIKE THIS POST IF YOU FOUND IT HELPFUL*
Slide From Left Updates/Networks Tab
Here is how the tab will look on your blog:
For a live preview, go to my (Megan) main blog here and look on the left!
Here is how to install the hover tab on your blog:
- First, find </style> in your theme. An easy way to do this is by pressing Ctrl+F and typing </style>.
- Once you find that, paste this code directly above it. If you cant find <style>, just paste it after <style> or <style type=”text/css”>.
- Next, you need to find <body> or </body>
- Once you have found that, paste this code either after <body> or before </body>
Now to customize your hover tab!
- Replace “SLIDE TITLE” with what you would like your tab to say. (ex: HOVER) You can also use some cute text symbols from here!
- Then replace “SLIDE TEXT GOES IN HERE (NETWORKS/UPDATES/WHATEVER YOU WANT)” with what you would want to say in your tab! Use the tag <br> to create a new line within the text!
* Like this post if you found it helpful! *
Popular Theme Blogs
- perfecticthemes
- wildthemes
- atlasdesigns
- themecloud
- timbllrthemes
- plainthemes
- bitched
- tit
- modernise
- zeldathemes
- clearthemes
Page layouts:
This list will be updated from time to time!
* Like this post if you found it helpful! *